System 36 Administration
Configuration Twinax
Twinax Workstation Setup
After installing the Bosanova software you must activate the machine. On computers with an email client installed this will automatically send an activation email. If this email was not sent correctly the activation information can be manually sent to a company, 10zig, for an activation code.
Twinax Connectivity
- USB Twinax (WinXP - Win7, 32-bit/64-bit)
Configuration ES32 System 36 Emulator
ES-Server (ES32 - System 36 Emulation Gateway)
To get access to the Gateway/Relay machine, do one of these:
- Physically login to the Gateway/Relay machine (server room).
- Connect to server via VNC at IP
192.168.0.47
ES-Client (ES32 - System 36 Emulation Client)
Install ES32 software or copy folder from \\server20081\Software and Settings\Software Installation Backup\es32 Bosanova Emulator\Copy of es32 from Program Files to C:\Program Files\ES32.
Run emuapp32.exe (as Administrator) from that folder.
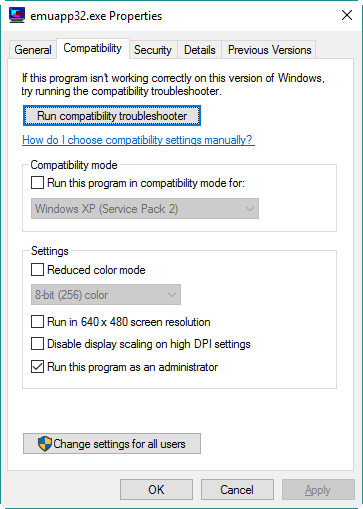
Answer 'No' when prompted to specify the Administrator's password.
Answer 'OK' when prompted to configure now.
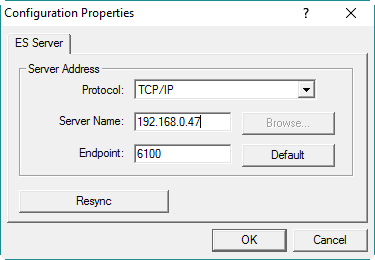
Configure ES Server:
- Protocol:
TCP/IP - Server Name:
192.168.0.47 - Endpoint:
6100
Configuration screen shows details. If necessary, close and open to verify changes took place. Click on menu File > Configure. 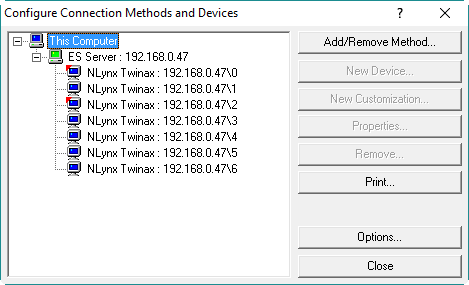
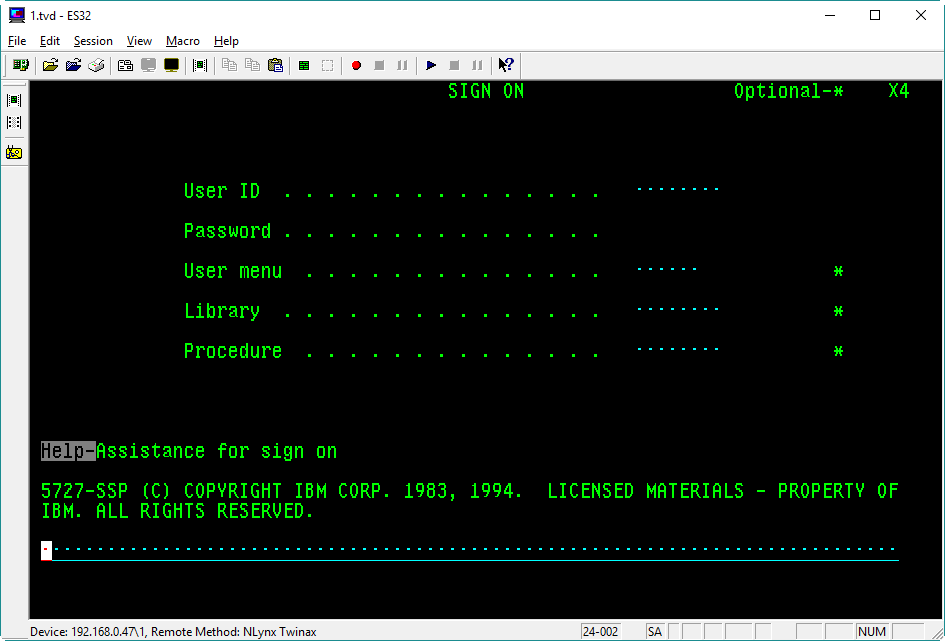
After closing initial configuration screen, you only see a blank session:
![]()
Select File > Open, and select folder C:\Program Files\ES32\192.168.0.47, then select a file with a free session. Eg: 1.tvd

Connecto to the sesssion if necessary. From the menu: Session > Connect
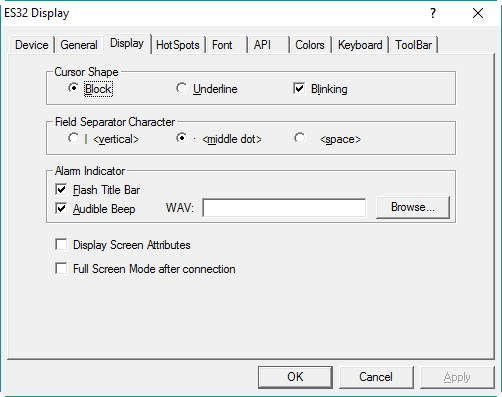
When connected normally, adjust some session settings: Session > Properties.
- Device: Automatically connect when opened (Checked).
- Display: Field Separator Character = Middle Dot.
- Keyboard: Under HostKey pick a key to remap:
- Enter = map it to <Enter> and <NumPad-Enter>
- Field Minus (NumPad Minus) = clear it
Ready to login.
Printer Capture Setup
System36 File Transfer Util
Review the Bosânova Configurator to have the correct device number for the session. NOTE: It must be 5224.
![]()
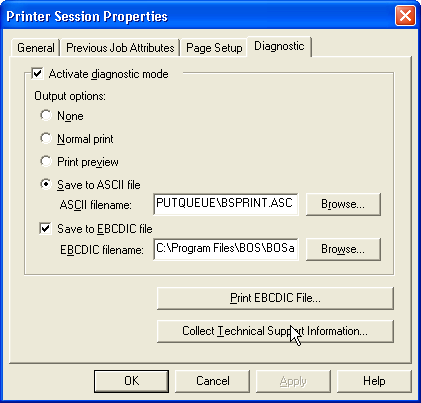
Review the Printer Session. Device Status > Diagnostic Mode should be < Print to ASCII file >.

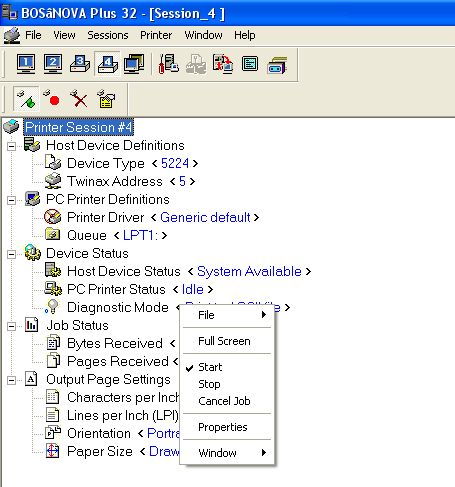
Go to Printer Session Properties (right-click 'Diagnostic Mode' for menu, then Properties).

Under Printer Session Properties, configure the Generic Printer:
- General (tab)
- Printer Driver: Custom Driver:
Generic default

Select the required printer. In this case, it should be Generic / Text Only.
![]()
Under Printer Session Properties, set output file:
- Diagnostic (tab)
- Activate diagnostic mode (checked)
- Output Options: Save to ASCII file
- ASCII filename:
C:\Program Files\Audina\Sys36FileTransfer\inputfiles\pf-input.txt
![]()
In Sys36FileTransfer, verify input file (it should match output file under Printer Session Properties > Diagnostic in Bosanova). It should be C:\Program Files\Audina\Sys36FileTransfer\inputfiles\pf-input.txt. See application settings:
![]()
![]()
These are the settings in file settings.ini:
[Application]
FormVersion=100
edInputFile_Text="C:\Program Files\Audina\Sys36FileTransfer\inputfiles\pf-input.txt"
chkSimulateFileGen_Checked=FALSE
edTargetDir_Text=\\server20081\documents and software\public\Sales Data
edTargetDirUser1_Text=\\server20081\documents and software\public\Sales Data
edTargetDirUser2_Text=C:\Documents and Settings\melissa.INVOICE\Desktop
edTargetDirUser3_Text=C:\Temp
edUserID1_Text=
edUserID2_Text=
edUserID3_Text=
chkKeepFileCopy_Checked=FALSE
There is also a batch file, called killfiletransfer.bat, to stop a transfer:
taskkill /F /IM FileTransfer36toPC.exe
The application is expecting a file with the following format:
const
  MaxLinesPerPage   = 66;           // maximum lines per page (raw input file)
  MAXUSERIDSIZE     = 8;            // maximum size (in char) for UserID
  MAXFILENAMESIZE   = 32;           // maximum size (in char) for Filename
  MAXRECCOUNTSIZE   = 6;            // maximum size (in char) for RecCount
  MAXRECPERLINESIZE = 2;            // maximum size (in char) for RecPerLine
  MAXLINESIZE       = 135;          // maximum line size to process

  //----------------------------------------------------------------------------
  // File Structure
  //----------------------------------------------------------------------------
  // Input File:
  //   +-+---------------------------+
  //   |1| Control String            |
  //   |2| Rec 1 (1st Line)          |
  //   |3| Rec 1 (2nd Line)          |
  //   |4| Rec 2 (1st Line)          |
  //   |5| Rec 3 (1st Line)          |
  //   | | etc...                    |
  //   +-+---------------------------+
  //----------------------------------------------------------------------------
  // Control string for each file to generate (1st line in input file)
  // %F<userid><targetfilename><reccount>  <-- format (all alphanum values)
  // Bytes 001-002 = Control %F (2 bytes)
  //       003-010 = User ID (from System36) (8 bytes)
  //       011-042 = Target Filename (32 bytes)
  //       043-048 = Record Count (6 bytes)
  //----------------------------------------------------------------------------
  ctrlChar         = 1;   // start byte for Control character.
  ctrlUserID       = 3;   // start byte for UserID
  ctrlTargetFile   = 11;  // start byte for Target Filename
  ctrlRecCount     = 43;  // start byte for Record Count
  ctrlRecPerLine   = 49;  // start byte for Records Per Line
  //----------------------------------------------------------------------------
  // Rec 1 (1st Line):
  // 1<data>
  //
  // Rec 1 (2nd Line, and subsequent record lines):
  // +<data>
  //
  // Example:
  //   +------------------------------------------------+
  //   |%FSYSTEM  testfile.txt                    002981
  //   |1"Salesman","State","Customer","Ship To","Name","Year","Jan","Feb","March","April","May","June","July","Aug","Sep","Oct","Nov","Dec"
  //   |1"","","EXAG03","0000","AURITONE SRL","04","1298.20","","20.00","2435.30","400.00","","","","","","",""
  //   |1"","","EXAG03","0000","AURITONE SRL","05","","","6070.50","","","","","","","","",""
  //   |1"","","EXEN05","0001","AUDIFON UK LIMITED","04","3360.00","2090.00","3970.00","3720.00","3480.00","","4350.00","8763.17","5130.00",
  //   |+"","4584.00","2900.00"
  //   |1"","","EXEN05","0001","AUDIFON UK LIMITED","05","","","3670.00","800.00","","1100.00","","","","","",""
  //   |1"","","EXEN12","0000","HEARING ELECTRONICS LIMITED","04","","","7585.00","","4633.00","1967.50","6970.00","20250.00","9463.00","646
  //   |+1.70","5110.00","
  //   +------------------------------------------------+
  //----------------------------------------------------------------------------
Warranty Card Printing
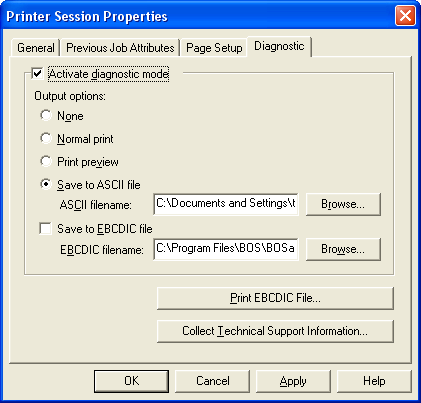
Review the Printer Session. Device Status > Diagnostic Mode should be < Print to ASCII file >.
Go to Printer Session Properties (right-click 'Diagnostic Mode' for menu, then Properties).
Under Printer Session Properties, configure the Generic Printer:
- General (tab)
- Printer Driver: Custom Driver:
Generic default
Select the required printer. In this case, it should be Generic / Text Only.
![]()
Under Printer Session Properties, set output file:
- Diagnostic (tab)
- Activate diagnostic mode (checked)
- Output Options: Save to ASCII file
- ASCII filename:
C:\Program Files\Audina\PrnWarrantyCard\INPUTQUEUE\BSPRINT.ASC
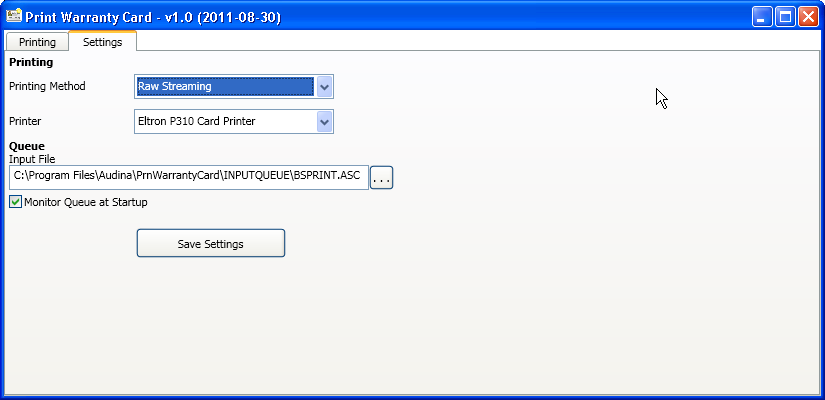
In PrnWarrantyCard, verify settings:
- Set input file (it should match output file under Printer Session Properties > Diagnostic in Bosanova). It should be
C:\Program Files\Audina\PrnWarrantyCard\INPUTQUEUE\BSPRINT.ASC. - Set Printing Method:
Raw Streaming - Set Printer:
Eltron P310 Card Printer
See application settings:
Invoice Labels Printing
When setting up Bosanova to print to the Zebra TLP 3742 printer it is important to note that Bosanova does not properly print when using the Zebra printer driver. Bosanova should always use the “Generic / Text Printer” driver. Even when using the “Generic / Text Printer” option the output from Bosanova may be malformed causing the printer to misbehave when receiving data.
To see the output Bosanova is producing and to get an idea of what could be wrong you can enable diagnostic mode from within the Bosanova printer configuration screen shown below.
Example Bosanova diagnostic ASCII output:
ZT
N
Q1000,24A700,300,1,4,2,1,N,"CA7728-0000
A625,300,1,4,2,1,N,"A+ HEARING AIDS
A550,300,1,4,2,1,N,"5519 SOUTH STREET
A475,300,1,4,2,1,N,"LAKEWOOD, CA  90713
A400,300,1,4,2,1,N,"
B770,800,1,3,2,5,96,N,"CA7728-0000"
B150,800,1,3,2,5,96,B,"843599"
A325,050,1,4,2,1,N,"NO CHARGE  2DAY
P1
Note: There are 2 problems with the above output.
- The lines end with the “form feed” character which makes label printer feed the whole label before continuing to the next line.
- Some of the lines containing quotes do not have an end-quote.
In order to manipulate the data Bosanova is sending before it gets to the printer we use a program called RedMon (http://pages.cs.wisc.edu/~ghost/redmon). RedMon sets up a fake printer port, for example “RPT1:”, and passes the data it receives in various ways. The way it is setup on the Invoice Label machine is shown below.
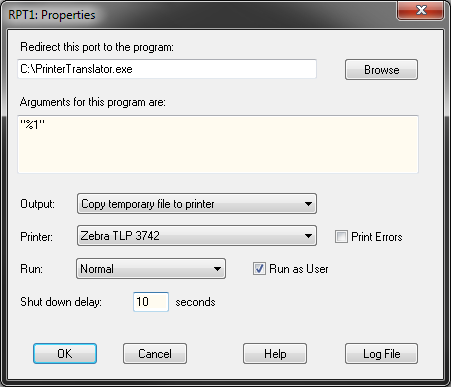
RedMon passes the original print job via STDIN to the program C:\PrinterTranslator.exe. It also passes a command line argument specifying where PrinterTranslator should save the output print job after making its changes. RedMon then takes the file and spools it directly to the selected printer, in this case Zebra TLP 3742.
PrinterTranslator is a basic program which accepts the STDIN input from RedMon, makes a few changes to the formatting and outputs the file. You can see the source code below.
using System;
using System.Collections.Generic;
using System.Linq;
using System.Text;
using System.IO;

namespace PrinterTranslator
{
  class Program
  {
	  static void Main(string[] args)
	  {
		  // Check if an output filename was provided and close if it wasn't.
		  string Filename = "";
		  if (args.Length == 0)
		  {
			  Console.WriteLine("No file was specified to write the translated data to... closing.");
			  return;
		  }
		  else
		  {
			  Filename = args[0];
		  }

		  bool UsingSTDIN = false;
		  string InputFile = "";
		  try
		  {
			  // This function throws an InvalidOperationException when the input is coming from STDIN.
			  UsingSTDIN = System.Console.KeyAvailable;

			  if (!UsingSTDIN)
				  return;
		  }
		  catch (InvalidOperationException e)
		  {
			  // Since we got this exception we know we got data from STDIN.
			  InputFile = System.Console.In.ReadToEnd();
		  }

		  string[] LinesToProcess = InputFile.Split('\f');

		  // Prep the file so we can save the fixed lines as we run through them.
		  StreamWriter OutFile = new StreamWriter(Filename);

		  // Fix the file formatting.
		  foreach (string Line in LinesToProcess)
		  {
			  string newLine = Line;

			  // Make sure all quotes are ended.
			  if (Line.Contains('"'))
			  {
				  int FirstQuote = Line.IndexOf('"');

				  if (FirstQuote != -1)
				  {
					  int LastQuote = Line.LastIndexOf('"');

					  if (FirstQuote == LastQuote)
						  newLine += '"';
				  }
			  }

			  // Write out the fixed line.
			  // Check if the string already contains a carriage return.
                          // In that case, we do not want to do a WriteLine(),
                          // as we will actually write 2 lines.
			  if (!(newLine == "\r\n"))
			  {
				  OutFile.WriteLine(newLine);
			  }
		  }
		  OutFile.Close();
	  }
  }
}
Invoice Printing
Invoice printing is accomplished through several different but connected Windows and web applications. See AMQP Message Queue for more information.
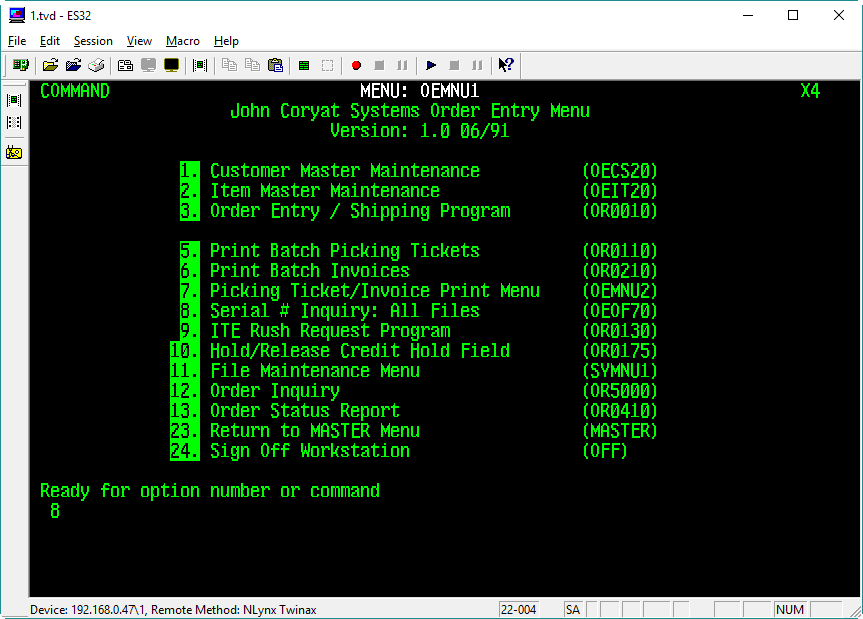
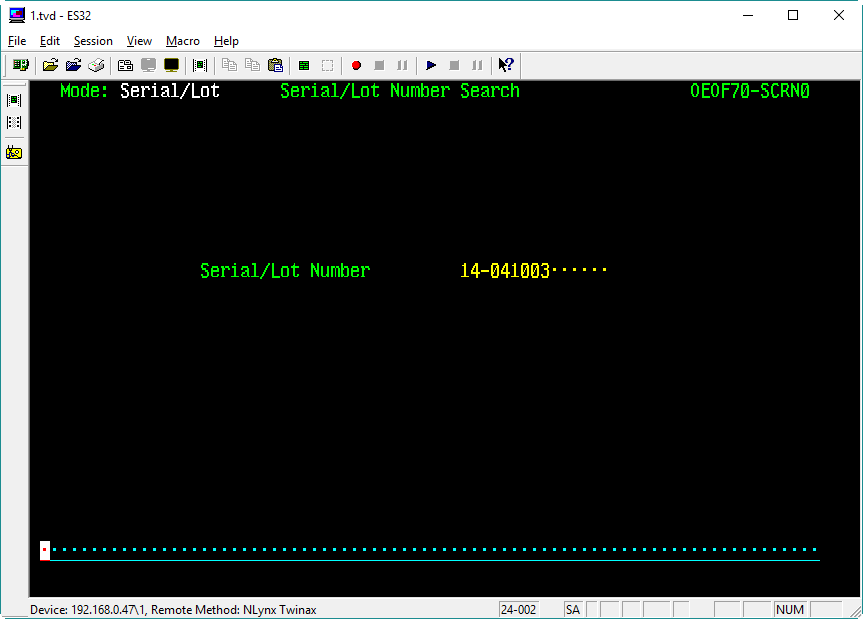
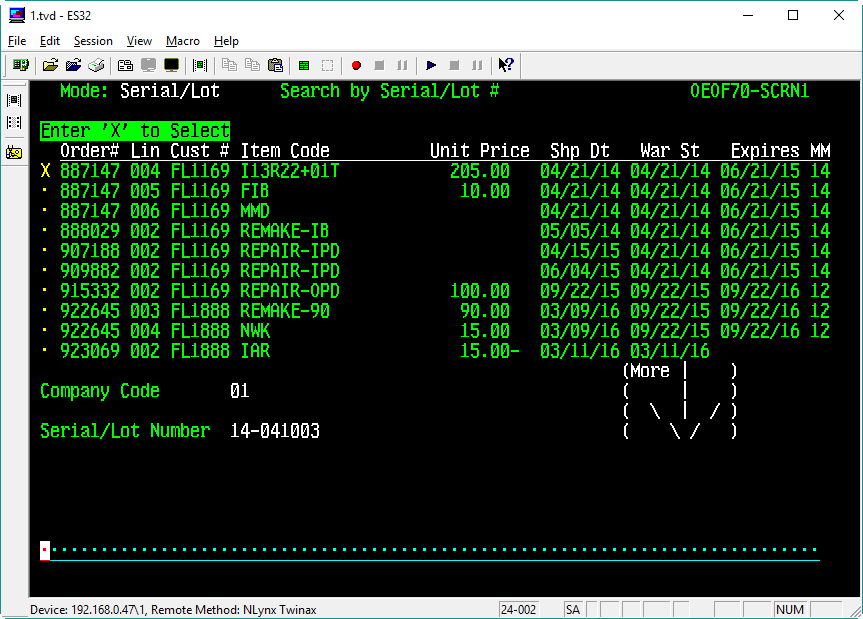
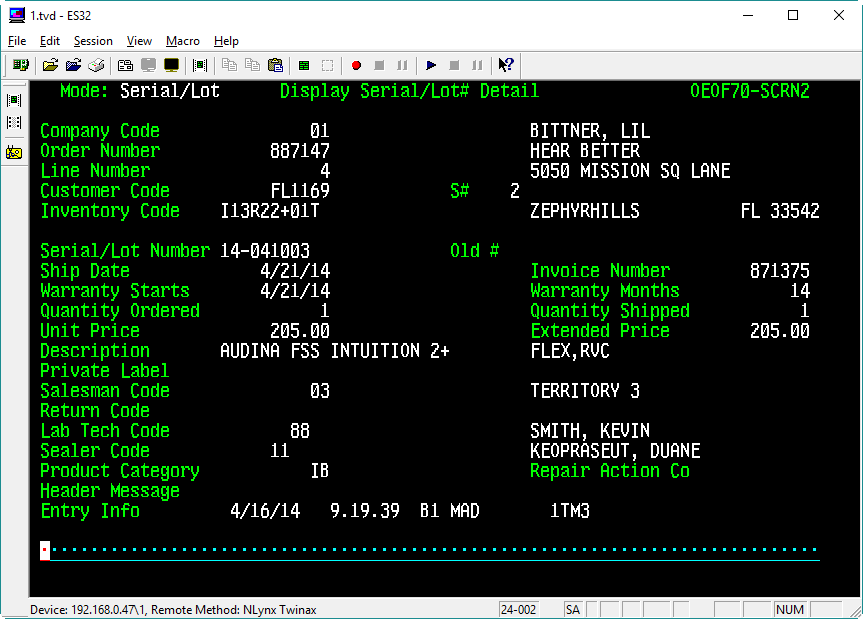
Query Serial Number
Select “1. Order Entry Main Menu” (menu option 1)
Select “8. Serial # Inquiry: All Files” (menu option 8)
Enter serial number (with hyphen separation after first two digits. Eg: 14-041003)
Put an 'X' in front of order number to view, then < Enter > .
Troubleshooting
Login to Console Administrator Account
At the login screen, enter default credentials to access system management functions.
- Username:
0-0 - Password:
MNGR
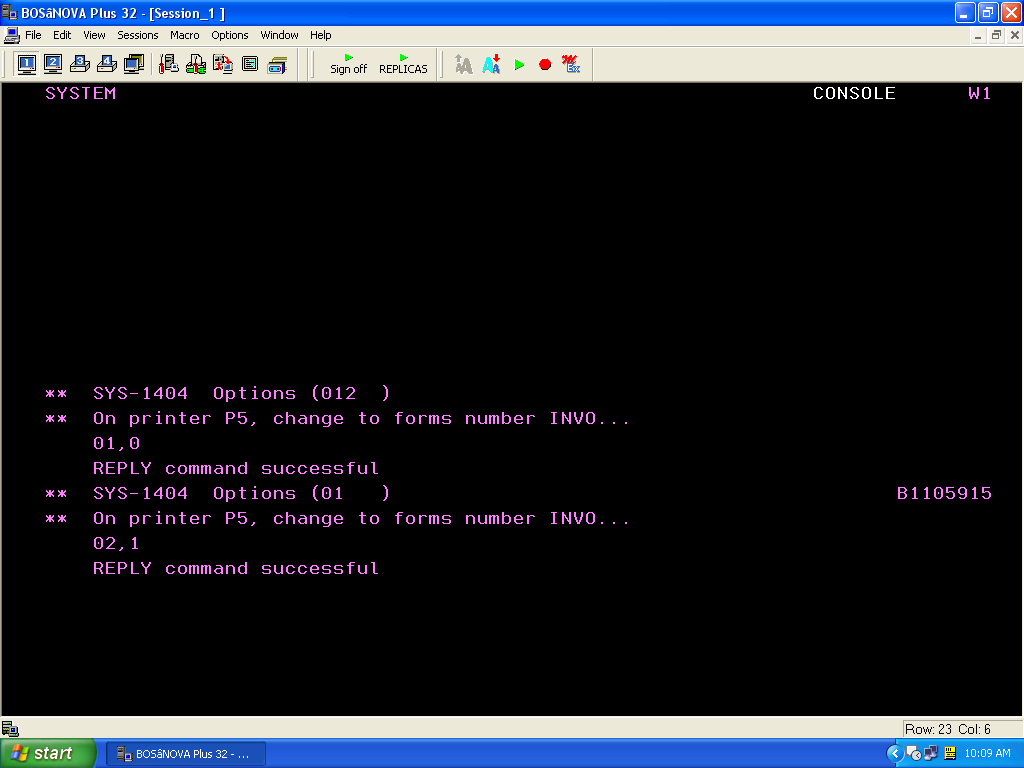
Answer System Error Messages
Answer messages in main console when other system users are having trouble or errors on their workstation:
In Bosanova, press < Shift > < ESC > < Enter >. This should list pending error messages.
To view errors, type REPLY C (or R C)
R C
R I
To clear error, type the error code, comma, then one of the options. For example, for
- Error
02 - Options
(012 ) - Type:
02,1.- If that clears the issue, return to main screen with < Shift > < ESC > < Enter >.
- If that does not resolve it, try the next option (except NEVER option 2). Eg:
02,0or02,3(if available). NOTE: Never option 2, since it halts the system. - Return to main screen with < Shift > < ESC > < Enter >.
User Session Failed
This process must be down on the Bosanova console machine. It is typically the Order Entry machine (Workstation W1) during the day. At the end of work day and at night the console is the terminal in the router/switch/phone closet.
To issue commands, follow these steps:
- Login to Bosanova.
- Go to system console to view messages: Press < Shift > < ESC >, then < Enter > (typically < Enter > from numeric pad).
- Issue a command.
| Console commands | Description |
|---|---|
| D W | Display Workstations |
| D P | Display Printers |
| D U | Display Users |
| R I | Reset Input screens (most input stations that closed a session without proper logout). |
| R C | Clear things that were reset (clear answered questions). |
| < Ctrl > | Perform a 'system reset' (clear error message on screen, to allow input again). |
Type D W (Display Workstations) to display list of workstations. 
Workstation Status: Find the workstation having issues by browsing (use < Shift > < Up > or < Down > to navigate). 
Change device status for the workstation having issues. 
Clear things that were reset (clear answered questions).
- Type
R C
R I
- It will show the JobNumber with problem, and available options.
- Type JobNumber,OptionNumber. Pick from these options:
- 1: Continue (recover session for the workstation/user in question)
- 2: Hold (Never use this option, if possible)
- 3: Dump (Cancels the job)
- Example:
R C
R I
11,3
![]()
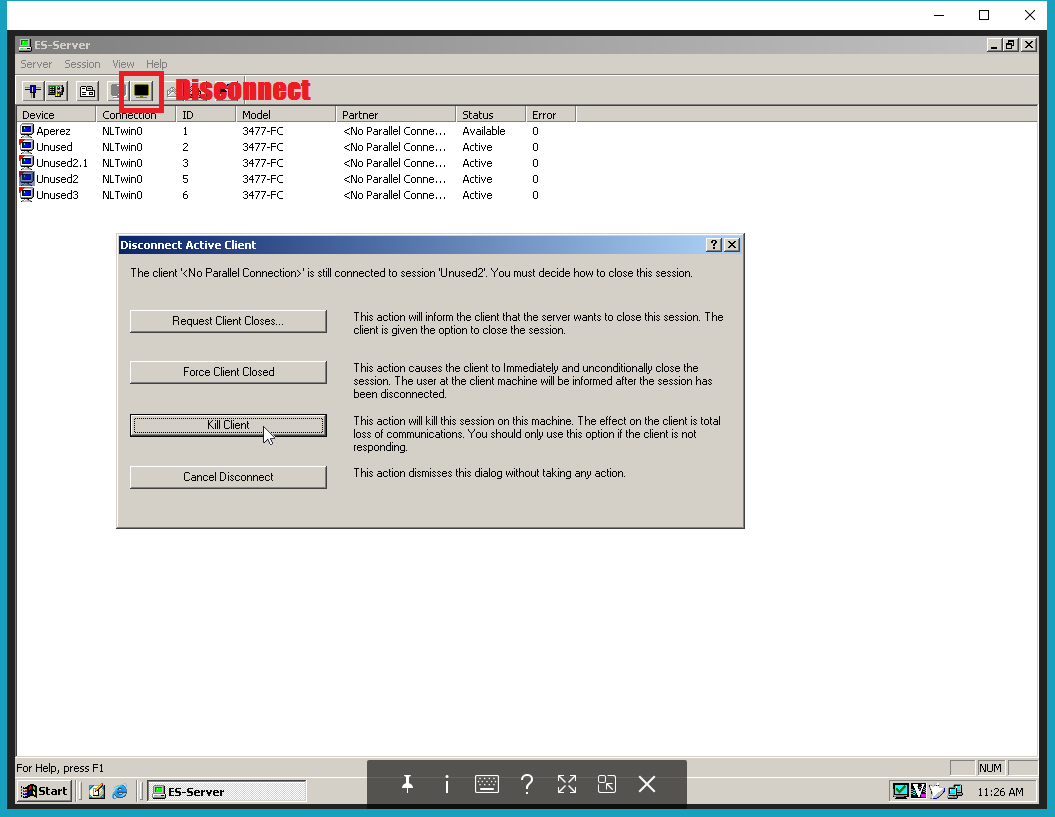
ES-Server User Session Failed (ES32 - System 36 Emulation Gateway)
On the Gateway PC:
- Physically connect to the Gateway PC (phone room), or VNC into Gateway PC (192.168.0.47). User Administrator's password.
- Open ES-Server application.
- Select the user's session/device.
- Click the disconnect button in the toolbar.
- Choose the option < “Kill Client” >.
On the Client PC:
- Connect with the ES32 Emulation Client, and select the session number that was disconnected (or select from the menu Session > Connect).
Troubleshooting:
- If client has connected but has a blank (black) screen, then check for messages on the Bosanova Console. After answering messages, try to reconnect.
Connections:
| User | Session Number |
|---|---|
| Frank | 0 |
| Shipping | 1 |
| Katie | 2 |
| Missy | 3 |
| Gale | 4 |
| Sheila | 5 |
| AJ | 6 |
Printer Queue Fails to Print
- Login to Kathy's workstation (named
KATHRY[sic]). - Stop and start Printer 3 and 4. Simply go to Session 3 or 4, then right-click on empty space to get submenu.
Commands
At the main menu, you can issue these commands:
ERP System
| Command | Description | Instructions |
|---|---|---|
AR0565 | Print address label. | |
OR5100 | Query orders. | |
OR5200 | Query orders (open & closed). | |
OR5000 | Query orders (summarized screen). | |
OR0010 | Add orders. | |
OR5100 | Query serial numbers in order. | Enter to view items in order. F2 twice, until Serial Number column is displayed. If CK8: SEE DETAIL listed, it contains serial numbers. F8 to view serial numbers. |
OECS20 | Update customer master file. | Enter Customer Account Number. F1 to update and view additional customer profile details. F7 to exit profile. |
OECS50 | Query customer profile. | Enter Customer Account Number. F6 to view additional customer profile details. |
OEPG50 | Query customer profile. | Enter Customer Account Number. Enter Ship To Address (number). NOTE: Not all “Ship To” have a profile, or same profile. < Shift >< Up/Down > to scroll to see entire profile. |
OEIT50 | Query product part using product code. | Alternative: 19. Inquiry Menu > 3. Item Master > Search by Item Code / Description. |
OEOF70 | Query Serial Number. |
Operating System
| Command | Description | Instructions |
|---|---|---|
CONSOLE GIVE | Console: Provide console access to admin for remote process. (You can give at any time, you don't lose console rights unless some other session 'takes' it.) | |
CONSOLE TAKE | Console: Regain console access from admin in order to answer messages. | Same as CONSOLE command. |
Initialize a blank tape
You can see the tape init options by using the command HELP TAPEINIT or the just run the command TAPEINIT TC,SL,BACKUP,CLEAR,,NOERASE,REWIND.
End of day procedure
- Cancel all print jobs, job queues and logout all users.
- Change the job queue to only 1 job.
Run command 'D J'
Choose option 10, “Change maximum active jobs”
Set “Number of Jobs” to 1
- Run command 'EOD' using F4 to add it to the job queue so you can continue working.
Month to Date: Current month start to 999999
Two Weeks: Start of current week to end.
- Run command 'HELP J'
Set “Library containing the procedure” to #Library
Set “Procedure name” to IPL